How to: Get your email signature

This page contains the assets and guides to help you install your email signatures within Microsoft Outlook (all versions).

There are two key steps, first is to get the new HTML file and the second is add it into Outlook.

Please use the buttons below to jump down to the desired information.

Step 1

Download the correct signature file below

Download the correct file below to your desktop, by right clicking on the relevant signature download button then selecting “Save as…” or “Save link as..” (depends on which browser you are using). When the dialog opens, please select your desktop and click “Save”.

null
Sky Media UK
Signature file (v2.0) for the UK
business (right click > Saves as)
Save as...
null
Sky Media Ireland
Signature file (v2.0) for the Irish
business (right click > Saves as)
Save as...

* If you’re looking for the AdSmart Signature files, please click here.

Step 2

Add the HTML to your Outlook and amend your details

Please select the outlook version you are using below for the relevant installation instructions.

Adding your signature to Outlook 2013

Follow these steps below, if you are using an older version of Microsoft Windows (XP or Vista) then there may be a few minor differences, but the principals remain the same.

  1. Find the .htm file you just downloaded (so we can prepare to move it to the correct folder)
  2. Now we need to locate where Outlook stores the signature files and this can be done in the following way:

[Start] Open Signature folder

Opening your signature folder

Follow these quick steps to access your signature folder.

  1. Go to FILE (in the top left)
  2. Click OPTIONS (couple of inches below)
  3. When the new window opens, click MAIL on the left hand side
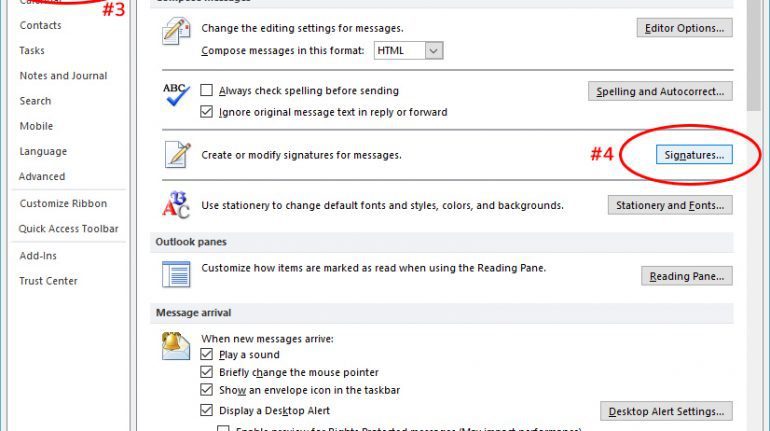
  4. Then on the right hold down CTRL + left click on the “Signatures” button to open your signatures folder.

Click on the picture to the right to see steps #3 and #4. (Fig. 1)

If these steps do not work, there are several other methods available. You should see something similar to the image (Fig. 2) below, however your more than likely going to have some files and folders already there, which we will clear up in a moment.

Steps #3 and #4 to open your signature folder
Fig. 1
Empty outlook signature folder
Fig. 2

[End] Open Signature folder

  1. Now that your folder is open, make sure you EXIT your Outlook, so that its closed. (It’s IMPORTANT!)
  2. Now assuming you only need one signature file on this PC, then you can delete the contents of the Signatures folder, so that it looks the same as the above image (Fig. 2).
  3. You can rename the downloaded HTML file if desired to your name, but it isn’t necessary, unless you need to identify more than one signature. The name of the file, is what will appear when you select your Outlook Signature.
  4. Drag/Move the downloaded HTML file from your desktop into your signatures folder that you just opened in point 2. You should see the following (in Fig. 3):
Outlook signature folder containing the new signature file
Fig. 3
  1. Once the file has been moved into the correct location, please open Outlook 2013.
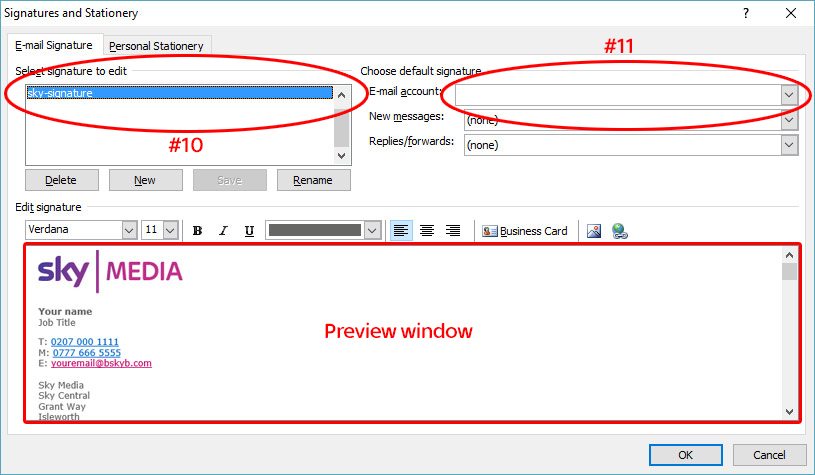
  2. Now we need to look at the signature options, so if you’re unfamiliar please repeat the steps outlined in point 2 above, but this time DO NOT hold down CTRL when click on “Signatures” button and you should the following (Fig. 4):
Signature selection window
Fig. 4
  1. Select your signature (the same name as your signature file) in the top left box. When it appears in the preview window, don’t worry if it’s appearance looks a little mis-shaped, this is outlooks preview rendering (which is pants).
  2. Please AMEND the signature details to your contact information, as this is not automatically added.
  3. On the right hand side you can select your “Email account” that you wish to use the signature for. It’s a good idea to select your email account in the two drop downs below (New Messages/Replies forwards) to ensure your signature is added to all correspondance.
  4. Click OK on “Signatures and Stationery” window
  5. Click OK on the “Outlook Options” window
  6. VOILA you’re Good-to-GO!!

Note: Don’t worry that your signatures folder will suddenly be populated with additional files (.RTF & .TXT files) and a folder, (of the same name) these are generated automatically by Outlook. They are associated assets and alternate email formats for non HTML emails.

Adding your signature to Outlook 2010

Follow these steps below, if you are using an older version of Microsoft Windows (XP or Vista) then there may be a few minor differences, but the principals remain the same.

  1. Find the .htm file you just downloaded (so we can prepare to move it to the correct folder)
  2. Now we need to locate where Outlook stores the signature files and this can be done in the following way:

[Start] Open Signature folder

Opening your signature folder

Follow these quick steps to access your signature folder.

  1. Go to FILE (in the top left)
  2. Click OPTIONS (couple of inches below)
  3. When the new window opens, click MAIL on the left hand side
  4. Then on the right hold down CTRL + left click on the “Signatures” button to open your signatures folder.

Click on the picture to the right to see steps #3 and #4. (Fig. 1)

If these steps do not work, there are several other methods available. You should see something similar to the image (Fig. 2) below, however your more than likely going to have some files and folders already there, which we will clear up in a moment.

Steps #3 and #4 to open your signature folder
Fig. 1
Empty outlook signature folder
Fig. 2

[End] Open Signature folder

  1. Now that your folder is open, make sure you EXIT your Outlook, so that its closed. (It’s IMPORTANT!)
  2. Now assuming you only need one signature file on this PC, then you can delete the contents of the Signatures folder, so that it looks the same as the above image (Fig. 2).
  3. You can rename the downloaded HTML file if desired to your name, but it isn’t necessary, unless you need to identify more than one signature. The name of the file, is what will appear when you select your Outlook Signature.
  4. Drag/Move the downloaded HTML file from your desktop into your signatures folder that you just opened in point 2. You should see the following (in Fig. 3):
Outlook signature folder containing the new signature file
Fig. 3
  1. Once the file has been moved into the correct location, please open Outlook 2010.
  2. Now we need to look at the signature options, so if you’re unfamiliar please repeat the steps outlined in point 2 above, but this time DO NOT hold down CTRL when click on “Signatures” button and you should the following (Fig. 4):
Signature selection window
Fig. 4
  1. Select your signature (the same name as your signature file) in the top left box. When it appears in the preview window, don’t worry if it’s appearance looks a little mis-shaped, this is outlooks preview rendering (which is pants).
  2. Please AMEND the signature details to your contact information, as this is not automatically added.
  3. On the right hand side you can select your “Email account” that you wish to use the signature for. It’s a good idea to select your email account in the two drop downs below (New Messages/Replies forwards) to ensure your signature is added to all correspondance.
  4. Click OK on “Signatures and Stationery” window
  5. Click OK on the “Outlook Options” window
  6. VOILA you’re Good-to-GO!!

Note: Don’t worry that your signatures folder will suddenly be populated with additional files (.RTF & .TXT files) and a folder, (of the same name) these are generated automatically by Outlook. They are associated assets and alternate email formats for non HTML emails.

Adding your signature to Outlook 2007

Follow these steps below, if you are using an older version of Microsoft Windows (XP or Vista) then there may be a few minor differences, but the principals remain the same.

  1. Find the .htm file you just downloaded (so we can prepare to move it to the correct folder)
  2. Now we need to locate where Outlook stores the signature files and this can be done in the following way:

[Start] Open Signature folder

Opening your signature folder

Follow these quick steps to access your signature folder.

  1. Go to TOOLS (in the top menu, if it’s not visible press the ALT button and it should appear)
  2. In the new menu drop down click OPTIONS
  3. When the new window opens, click MAIL Format tab on the left hand side
  4. Then on the right hold down CTRL + left click on the “Signatures” button to open your signatures folder.

Click on the picture to the right to see steps #3 and #4. (Fig. 1)

If these steps do not work, there are several other methods available. You should see something similar to the image (Fig. 2) below, however your more than likely going to have some files and folders already there, which we will clear up in a moment.

Steps #3 and #4 to open your signature folder
Fig. 1
Empty outlook signature folder
Fig. 2

[End] Open Signature folder

  1. Now that your folder is open, make sure you EXIT your Outlook, so that its closed. (It’s IMPORTANT!)
  2. Now assuming you only need one signature file on this PC, then you can delete the contents of the Signatures folder, so that it looks the same as the above image (Fig. 2).
  3. You can rename the downloaded HTML file if desired to your name, but it isn’t necessary, unless you need to identify more than one signature. The name of the file, is what will appear when you select your Outlook Signature.
  4. Drag/Move the downloaded HTML file from your desktop into your signatures folder that you just opened in point 2. You should see the following (in Fig. 3):
Outlook signature folder containing the new signature file
Fig. 3
  1. Once the file has been moved into the correct location, please open Outlook 2007.
  2. Now we need to look at the signature options, so if you’re unfamiliar please repeat the steps outlined in point 2 above, but this time DO NOT hold down CTRL when click on “Signatures” button and you should the following (Fig. 4):
Signature selection window
Fig. 4
  1. Select your signature (the same name as your signature file) in the top left box. When it appears in the preview window, don’t worry if it’s appearance looks a little mis-shaped, this is outlooks preview rendering (which is pants).
  2. Please AMEND the signature details to your contact information, as this is not automatically added.
  3. On the right hand side you can select your “Email account” that you wish to use the signature for. It’s a good idea to select your email account in the two drop downs below (New Messages/Replies forwards) to ensure your signature is added to all correspondance.
  4. Click OK on “Signatures and Stationery” window
  5. Click OK on the “Outlook Options” window
  6. VOILA you’re Good-to-GO!!

Note: Don’t worry that your signatures folder will suddenly be populated with additional files (.RTF & .TXT files) and a folder, (of the same name) these are generated automatically by Outlook. They are associated assets and alternate email formats for non HTML emails.

Adding your signature to Outlook 2016 on the Mac

*NOTE: If you are using Outlook version 15.22 + and above there is a small bug that results in the formatting for your signature to display incorrectly (wrong font and positioning a little off). Unfortunately the only workaround at present is to purchase an app from the Mac App Store for $1.99 and install it.

Follow these steps below, if you are using an older version of Microsoft Outlook on the Mac then there may be a few minor differences, but the principals remain the same (and you should not need the above app).

Open and copy the signature

  1. Find the .htm file you just downloaded (so we can open it to copy and paste the contents)
  2. Double click or open it in your favourite internet browser
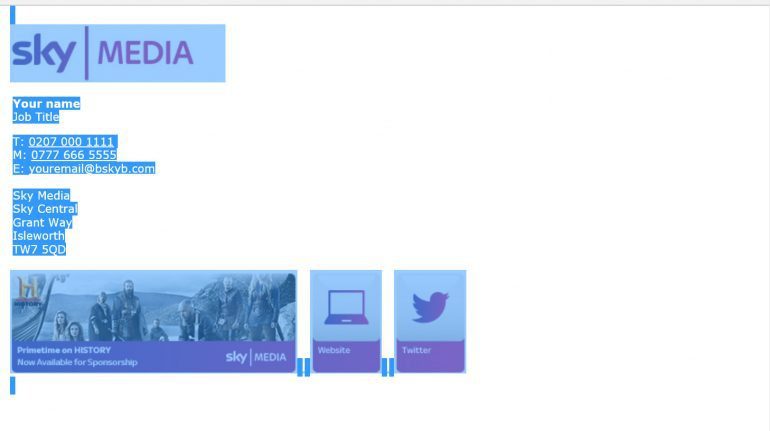
  3. Select all of the content within the browser window COMMAND + A (Fig 1.)
  4. Copy all of the contents COMMAND + C
Fig 1.

Open Outlook and the Signature options

  1. Open Microsoft Outlook
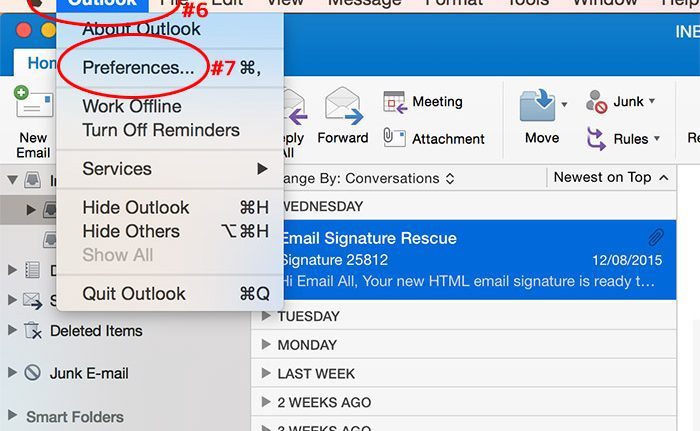
  2. Click Outlook on the toolbar in the top left to open the drop down menu
  3. Click Preferences (Fig 2)
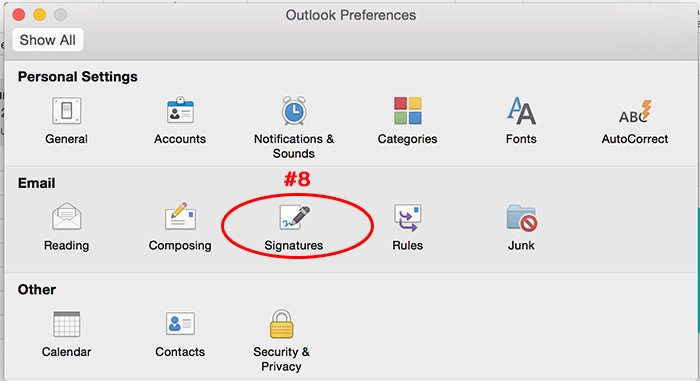
  4. In the “Outlook Preferences” window, select Signatures (Fig 3)
Fig 2.
Fig 3.

Adding the signature file and customising

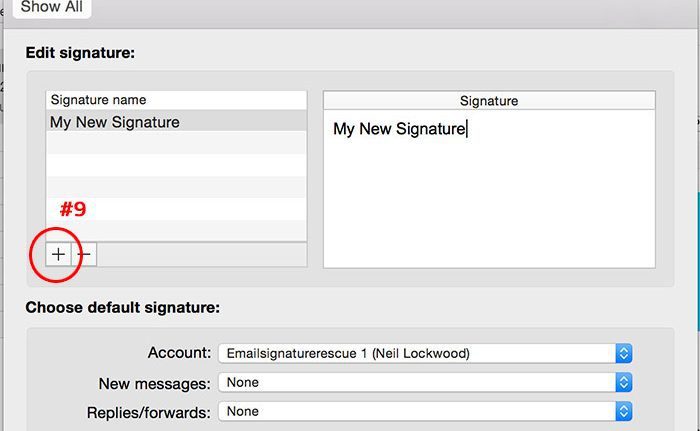
  1. In the “Signatures” window, under the left hand box (titled Signature name) click the little plus icon + to add a new signature (Fig 4)
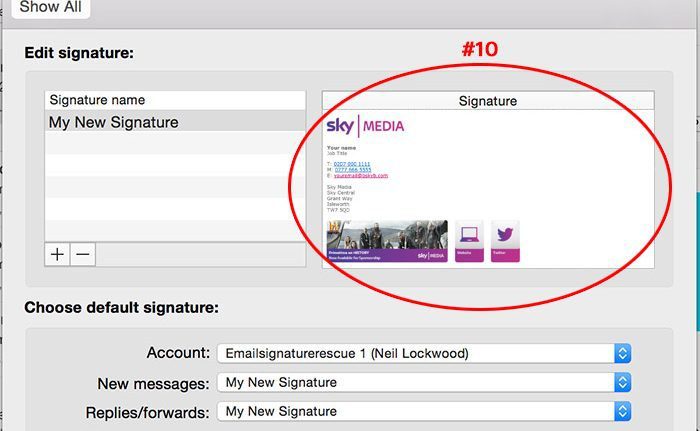
  2. In the right hand box (titled signature) paste in your new signature COMMAND + V (Fig 5)
  3. Amend and customise the existing contact details to your profile.
  4. Select the desired options below how you want the signature to automatically appear and to which email account
  5. Close the settings window
Fig 4.
Fig 5.

Finished!

  1. Restart Outlook
  2. VOILA you’re Good-to-GO!!
TEST
Outlook 2013

Adding your signature to Outlook 2013

Follow these steps below, if you are using an older version of Microsoft Windows (XP or Vista) then there may be a few minor differences, but the principals remain the same.

  1. Find the .htm file you just downloaded (so we can prepare to move it to the correct folder)
  2. Now we need to locate where Outlook stores the signature files and this can be done in the following way:

[Start] Open Signature folder

Opening your signature folder

Follow these quick steps to access your signature folder.

  1. Go to FILE (in the top left)
  2. Click OPTIONS (couple of inches below)
  3. When the new window opens, click MAIL on the left hand side
  4. Then on the right hold down CTRL + left click on the “Signatures” button to open your signatures folder.

Click on the picture to the right to see steps #3 and #4. (Fig. 1)

If these steps do not work, there are several other methods available. You should see something similar to the image (Fig. 2) below, however your more than likely going to have some files and folders already there, which we will clear up in a moment.

Steps #3 and #4 to open your signature folder
Fig. 1
Empty outlook signature folder
Fig. 2

[End] Open Signature folder

  1. Now that your folder is open, make sure you EXIT your Outlook, so that its closed. (It’s IMPORTANT!)
  2. Now assuming you only need one signature file on this PC, then you can delete the contents of the Signatures folder, so that it looks the same as the above image (Fig. 2).
  3. You can rename the downloaded HTML file if desired to your name, but it isn’t necessary, unless you need to identify more than one signature. The name of the file, is what will appear when you select your Outlook Signature.
  4. Drag/Move the downloaded HTML file from your desktop into your signatures folder that you just opened in point 2. You should see the following (in Fig. 3):
Outlook signature folder containing the new signature file
Fig. 3
  1. Once the file has been moved into the correct location, please open Outlook 2013.
  2. Now we need to look at the signature options, so if you’re unfamiliar please repeat the steps outlined in point 2 above, but this time DO NOT hold down CTRL when click on “Signatures” button and you should the following (Fig. 4):
Signature selection window
Fig. 4
  1. Select your signature (the same name as your signature file) in the top left box. When it appears in the preview window, don’t worry if it’s appearance looks a little mis-shaped, this is outlooks preview rendering (which is pants).
  2. Please AMEND the signature details to your contact information, as this is not automatically added.
  3. On the right hand side you can select your “Email account” that you wish to use the signature for. It’s a good idea to select your email account in the two drop downs below (New Messages/Replies forwards) to ensure your signature is added to all correspondance.
  4. Click OK on “Signatures and Stationery” window
  5. Click OK on the “Outlook Options” window
  6. VOILA you’re Good-to-GO!!

Note: Don’t worry that your signatures folder will suddenly be populated with additional files (.RTF & .TXT files) and a folder, (of the same name) these are generated automatically by Outlook. They are associated assets and alternate email formats for non HTML emails.

Outlook 2010

Adding your signature to Outlook 2010

Follow these steps below, if you are using an older version of Microsoft Windows (XP or Vista) then there may be a few minor differences, but the principals remain the same.

  1. Find the .htm file you just downloaded (so we can prepare to move it to the correct folder)
  2. Now we need to locate where Outlook stores the signature files and this can be done in the following way:

[Start] Open Signature folder

Opening your signature folder

Follow these quick steps to access your signature folder.

  1. Go to FILE (in the top left)
  2. Click OPTIONS (couple of inches below)
  3. When the new window opens, click MAIL on the left hand side
  4. Then on the right hold down CTRL + left click on the “Signatures” button to open your signatures folder.

Click on the picture to the right to see steps #3 and #4. (Fig. 1)

If these steps do not work, there are several other methods available. You should see something similar to the image (Fig. 2) below, however your more than likely going to have some files and folders already there, which we will clear up in a moment.

Steps #3 and #4 to open your signature folder
Fig. 1
Empty outlook signature folder
Fig. 2

[End] Open Signature folder

  1. Now that your folder is open, make sure you EXIT your Outlook, so that its closed. (It’s IMPORTANT!)
  2. Now assuming you only need one signature file on this PC, then you can delete the contents of the Signatures folder, so that it looks the same as the above image (Fig. 2).
  3. You can rename the downloaded HTML file if desired to your name, but it isn’t necessary, unless you need to identify more than one signature. The name of the file, is what will appear when you select your Outlook Signature.
  4. Drag/Move the downloaded HTML file from your desktop into your signatures folder that you just opened in point 2. You should see the following (in Fig. 3):
Outlook signature folder containing the new signature file
Fig. 3
  1. Once the file has been moved into the correct location, please open Outlook 2010.
  2. Now we need to look at the signature options, so if you’re unfamiliar please repeat the steps outlined in point 2 above, but this time DO NOT hold down CTRL when click on “Signatures” button and you should the following (Fig. 4):
Signature selection window
Fig. 4
  1. Select your signature (the same name as your signature file) in the top left box. When it appears in the preview window, don’t worry if it’s appearance looks a little mis-shaped, this is outlooks preview rendering (which is pants).
  2. Please AMEND the signature details to your contact information, as this is not automatically added.
  3. On the right hand side you can select your “Email account” that you wish to use the signature for. It’s a good idea to select your email account in the two drop downs below (New Messages/Replies forwards) to ensure your signature is added to all correspondance.
  4. Click OK on “Signatures and Stationery” window
  5. Click OK on the “Outlook Options” window
  6. VOILA you’re Good-to-GO!!

Note: Don’t worry that your signatures folder will suddenly be populated with additional files (.RTF & .TXT files) and a folder, (of the same name) these are generated automatically by Outlook. They are associated assets and alternate email formats for non HTML emails.

Outlook 2007

Adding your signature to Outlook 2007

Follow these steps below, if you are using an older version of Microsoft Windows (XP or Vista) then there may be a few minor differences, but the principals remain the same.

  1. Find the .htm file you just downloaded (so we can prepare to move it to the correct folder)
  2. Now we need to locate where Outlook stores the signature files and this can be done in the following way:

[Start] Open Signature folder

Opening your signature folder

Follow these quick steps to access your signature folder.

  1. Go to TOOLS (in the top menu, if it’s not visible press the ALT button and it should appear)
  2. In the new menu drop down click OPTIONS
  3. When the new window opens, click MAIL Format tab on the left hand side
  4. Then on the right hold down CTRL + left click on the “Signatures” button to open your signatures folder.

Click on the picture to the right to see steps #3 and #4. (Fig. 1)

If these steps do not work, there are several other methods available. You should see something similar to the image (Fig. 2) below, however your more than likely going to have some files and folders already there, which we will clear up in a moment.

Steps #3 and #4 to open your signature folder
Fig. 1
Empty outlook signature folder
Fig. 2

[End] Open Signature folder

  1. Now that your folder is open, make sure you EXIT your Outlook, so that its closed. (It’s IMPORTANT!)
  2. Now assuming you only need one signature file on this PC, then you can delete the contents of the Signatures folder, so that it looks the same as the above image (Fig. 2).
  3. You can rename the downloaded HTML file if desired to your name, but it isn’t necessary, unless you need to identify more than one signature. The name of the file, is what will appear when you select your Outlook Signature.
  4. Drag/Move the downloaded HTML file from your desktop into your signatures folder that you just opened in point 2. You should see the following (in Fig. 3):
Outlook signature folder containing the new signature file
Fig. 3
  1. Once the file has been moved into the correct location, please open Outlook 2007.
  2. Now we need to look at the signature options, so if you’re unfamiliar please repeat the steps outlined in point 2 above, but this time DO NOT hold down CTRL when click on “Signatures” button and you should the following (Fig. 4):
Signature selection window
Fig. 4
  1. Select your signature (the same name as your signature file) in the top left box. When it appears in the preview window, don’t worry if it’s appearance looks a little mis-shaped, this is outlooks preview rendering (which is pants).
  2. Please AMEND the signature details to your contact information, as this is not automatically added.
  3. On the right hand side you can select your “Email account” that you wish to use the signature for. It’s a good idea to select your email account in the two drop downs below (New Messages/Replies forwards) to ensure your signature is added to all correspondance.
  4. Click OK on “Signatures and Stationery” window
  5. Click OK on the “Outlook Options” window
  6. VOILA you’re Good-to-GO!!

Note: Don’t worry that your signatures folder will suddenly be populated with additional files (.RTF & .TXT files) and a folder, (of the same name) these are generated automatically by Outlook. They are associated assets and alternate email formats for non HTML emails.

Outlook 2016

Adding your signature to Outlook 2016 on the Mac

*NOTE: If you are using Outlook version 15.22 + and above there is a small bug that results in the formatting for your signature to display incorrectly (wrong font and positioning a little off). Unfortunately the only workaround at present is to purchase an app from the Mac App Store for $1.99 and install it.

Follow these steps below, if you are using an older version of Microsoft Outlook on the Mac then there may be a few minor differences, but the principals remain the same (and you should not need the above app).

Open and copy the signature

  1. Find the .htm file you just downloaded (so we can open it to copy and paste the contents)
  2. Double click or open it in your favourite internet browser
  3. Select all of the content within the browser window COMMAND + A (Fig 1.)
  4. Copy all of the contents COMMAND + C
Fig 1.

Open Outlook and the Signature options

  1. Open Microsoft Outlook
  2. Click Outlook on the toolbar in the top left to open the drop down menu
  3. Click Preferences (Fig 2)
  4. In the “Outlook Preferences” window, select Signatures (Fig 3)
Fig 2.
Fig 3.

Adding the signature file and customising

  1. In the “Signatures” window, under the left hand box (titled Signature name) click the little plus icon + to add a new signature (Fig 4)
  2. In the right hand box (titled signature) paste in your new signature COMMAND + V (Fig 5)
  3. Amend and customise the existing contact details to your profile.
  4. Select the desired options below how you want the signature to automatically appear and to which email account
  5. Close the settings window
Fig 4.
Fig 5.

Finished!

  1. Restart Outlook
  2. VOILA you’re Good-to-GO!!

Step 3

If you’re experiencing issues with your Outlook signature or banner

Here are a couple of Q&A’s to help you solve any display issues you might be having.

Issues with your Outlook signature

Click on any of the questions below.

Q: Should the Sky Media logo display funny as i am adding my signature?

As briefly mentioned in the above guide, unfortunately Outlook adds its own HTML (XML tags) around the signature file code and displays a little wonky in the preview mode. However, when you open a new email, it should display correctly. If not, please delete the signature, download a new copy and add it again, if the issue persists please contact piers@digital-zest.com.

Q: Why are the text colours changing with my contact details?

This can happen if your new content is not within the style tags (that you cannot see). One option is to put your cursor within the existing word and type into it, later removing any letters before or after your text.

Another option would be to highlight the text and select from Outlooks text colour selector and style it yourself. When you click on colour drop down next to U underline, a new window appears. Select the Custom tab and enter the following RGB values for each respective element.

  • Text colour: R: 102 – G: 102 – B: 102
  • Highlight: R: 193 – G: 0  – B: 104
Q: Why are none of the images showing?

If the image placeholders are showing a little red X then Outlook cannot find the images at their address or they are being blocked.

Click this link: https://www.skymedia.co.uk/banners/sm-skymedia-logo.jpg 

If you see the image, then they are not being blocked, so the signature file may have been corrupted on your computer. Please download a new copy and add it into Outlook as before.

Q: How do I know which signature version i am using?

To find out which Signature HTML file you are using there are two ways:

Option 1 – Version number
Take a look at your email signature, highlight (select all) everything and under the banner image you should see:

  • Old version will display nothing
  • Newer versions will display something similar to this: “SM UK Signature v2.0“, please copy and paste this when requiring support.

Option 2 – Image button differences
Look at the buttons sitting to the right of the prop banner (website/twitter/linked in):

  • Old version will display text left aligned
  • Newer versions will display text centrally aligned
Q: What are the numbers (1.2) for on the Sky Central line of the address?

The numbers represent the neighbourhood you generally sit within at Sky Central. Please ensure it is correct to help any physical mail to be processed correctly.

Issues with the email prop banner

Click on any of the questions below.

Q: Why isn't my banner showing the latest image?

Without getting too technical, computers/servers/applications all use a technology called “caching” that stores local copies of commonly accessed files to reduce bandwidth. In corporate environments this is critical to reduce the load across the network, which is great for network speed, but in turn can be frustrating when files do not update.

You cannot do anything about the server’s cache, but you can try to access the file via a hyper link to attempt to force the caches to acknowledge a new file and update.

Try visiting either of these link sets below (It depends on your signature file)

Old signature file
(Not installed via the download link on this page):

  1. UK: https://www.skymedia.co.uk/banners/sm-banner.jpg
  2. Ireland: https://www.skymedia.co.uk/banners/sm-banner-ie.jpg

New signature file
(Downloaded from this page and displays v2.0 or higher at the bottom in grey):

  1. UK: https://www.skymedia.co.uk/banners/banner.php?url=uk
  2. Ireland: https://www.skymedia.co.uk/banners/banner.php?url=ie
What do you see?

If the banner image is incorrect, try refreshing the page three times quickly (CTRL + F5). If you see the new banner, then you’re all done and this will now appear in your outlook signatures, once you re-start outlook.

Note: External viewers/recipients of your email, whom have different/smaller/no corporate caching will already see the new image. This process is only helps to update the image your end.

Alternatively you could try clearing your browsers cache (bit more advanced)

Outlook uses the same computer storage directory as their internet browser, essentially the settings/file storage locations to store it’s cachable files can be cleared together. (Yes yet another level of caching, but this time on your computer)

So we can attempt to clear this via opening Internet Explorer or Edge (depending on what version of windows you are using) and going to it’s settings to clear the local cache.

Microsoft Edge

  1. Open Edge
  2. Click on Settings
  3. Click on Clear browsing data
  4. Click on Choose what to clear
  5. Tick: Cached data and files
  6. Click Clear.

Microsoft Internet Explorer

  1. Open Internet explorer
  2. Click on Tools
  3. Click on Internet Options
  4. In the General Tab find “Browsing history”
  5. Then click Delete button
  6. Tick the Temporary Internet files checkbox
  7. Then Click Delete
  8. Click Ok

Close Outlook, re-open it and try again.

If the banner does not update, unfortunately you will have to wait until your corporate server next recycles it’s cache (typically every 48 hours).
Q: Why when I click on the banner is it going to the wrong page?

If the banner, when clicked (from your email) is navigating to the wrong place, then the redirect script on the server needs updating. Please email piers@digital-zest.com to get this updated ASAP.

Q: My banner is displaying all out of place?

If the banner and the social media icons are displaying all out of place, then unfortunately you will need delete, re-install your banner and amend your details once again, as detailed in step 2 above.

Our Sites

Please click on any of the sites below to open the link in a new window